Cherry Tart Recipe
- Jul 15, 2019
- 4 min read
Updated: Dec 16, 2019
A creamy, delicious and impressive Cherry Tart Recipe you can make at home! Fresh cherries, a delicious pastry cream and a flaky tart crust make this sophisticated dessert.

So by now you have probably heard me talk about the copious amounts of cherries we purchased this summer. I was determined to make a bunch of cherry treats but to be honest, I had no idea what to make. I spent some time browsing social media and the internet for some inspiration. I've seen a lot of pictures of impressive desserts including tarts. I had never made a tart, but decided to give it a try! That's how I roll.
I adapted this recipe from Martha Stewart (of course), watched a few videos on youtube and went for it. The result was pretty impressive if I do say so myself, and absolutely yummy. There are several steps and you will not be whipping this up quickly, but the steps flow pretty easily.
If you don't have cherries, you could always use blueberries or raspberries or whatever you like. That's what's great about fruit recipes, they are usually pretty versatile. I also used a little maraschino liqueur syrup from my recipe HERE, but you could always just use regular cherry syrup (recipe at bottom). Lastly, I used an 8" tart pan. You could easily fill 9-12" pan with this recipe so use whatever you have!
Crust Ingredients
2 ½ cups all-purpose flour
⅓ cup sugar
1 pinch of salt
2 sticks unsalted butter, cold and cut into pieces
¼ cup ice water
3 egg yolks, beaten
Crust Directions
(This makes A LOT of dough so plan for 2 tarts or freeze for future projects)
1. Place flour, sugar, and salt into a bowl and stir to combine. Add butter pieces and incorporate with pastry cutter until mixture becomes crumbly.
2. A ice water a little at a time, mixing in each time until all the water is incorporated.
3. Add egg yolks last, and mix in until you have a wet, sticky dough.
4. Place on floured surface and roll into a ball. Divide dough in half, pat into round discs, and wrap in plastic. Chill for at least 1 hour.

5. Turn out dough onto a lightly floured work surface. Roll out to about a 12-inch round, about ¼ inch thick (it doesn't have to be perfect because you will cut off excess).

6. Gently place rolled out dough onto tart pan and pat into place using fingers. Form around edges and use fingers to push excess dough off using sharp edges. Place in freezer for 15 minutes.
7. While in freezer, preheat oven to 375 degrees.
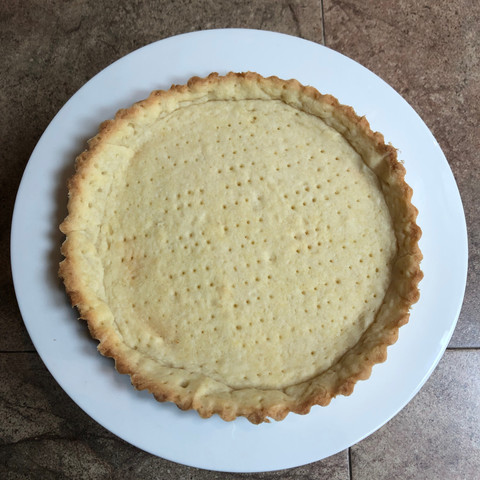
8. Remove crust from freezer and pierce all over with a fork to ensure crust doesn't bubble while cooking.

9. Place a piece of parchment paper on top (about 2-3 inches overhang). Fill with pie weights or something heavy. I do not have pie weights so I used some beans that have been in my pantry forever (do not eat after using as weights😁).


10. Bake for 20 minutes. Remove parchment and weights and bake for another 10 to 12 minutes more. Place on a wire rack to cool.


Pastry Cream and Cherry Topping Ingredients
½ cup sugar
¼ cup cornstarch
Pinch of salt
2 cups whole milk
4 large egg yolks
2 tablespoons unsalted butter
1 teaspoon vanilla extract
½ cup cold heavy cream, whipped
3 cups fresh cherries, pitted and cut in half
¼ cup maraschino cherry syrup (see RECIPE here)
Pastry Cream Directions
1. Place sugar, cornstarch, and salt in a medium saucepan and whisk together.
2. Add milk and egg yolks to another bowl and whisk together and add to saucepan.
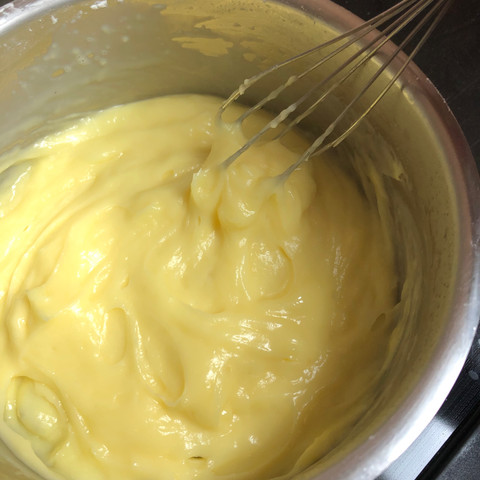
3. Lastly, add butter to saucepan and cook over medium heat until mixture comes to a boil. This happened VERY quickly for me and instantly turned into a thick cream. **


4. Remove from heat and stir in vanilla.
5. Place cream in a bowl and cover with plastic wrap, pressing it directly onto the surface of the pastry cream to prevent a skin from forming. Refrigerate for a minimum of 2 hours.

6. Right before you remove cooled pastry cream from refrigerator, add whipping cream to a bowl and beat with a hand mixer to make a whipped cream.
7. Once cream has cooled, whisk one more time to get mixture creamy. Fold in whipped cream.

Tart Assembly Directions
1. Add pastry cream to tart shell.

2. Next, take sliced cherries and place on top of pastry cream until entire surface is covered.

3. Spoon maraschino cherry syrup of top of cherries slowly until covered being careful not to overfill and spill over edge.

4. Place tart in refrigerator for 30 -60 minutes so everything is fully chilled and set. Enjoy!

Cherry Syrup Recipe
1 cup water
1 cup sugar
2 cups cherries, pitted and stems removed
Add all ingredients to a saucepan. Cook over medium heat, stirring and smashing cherries until boiling. Boil for 1 minute and remove from heat. Smash cherries more to release juices and then allow to cool completely. Once cooled, strain cherries from syrup, add to a sealable jar or bottle and store in refrigerator for up to two weeks!
If you need more cherry recipe ideas, check out my Cherry Crumble Bars recipe HERE!
** OK, so the pastry cream recipe I was using for inspiration called for straining the mixture after boiling but before adding the vanilla. I found that my cream came together so fast it wasn't strainable and didn't seem to make a difference. SInce this was the first time I made this, it could have been a fluke but it did not seem to change the pastry cream in appearance or taste.


Comments